Lustre Guide
Table of Contents
1. Introduction
HPC systems at the ERDC DSRC employ the Lustre high-performance, parallel file system for storage of user data. Storage locations utilizing Lustre include user home and temporary work directories as well as directories for user projects and applications. The scope of this document is restricted to the file system(s) containing the temporary user work directories ($WORKDIR). It describes some of the general physical characteristics of a typical Lustre file system, technical specifications of our work file system(s), and tips on optimizing I/O performance.
Section 2 provides background for those unfamiliar with Lustre;
advanced users may wish to skip this section.
Section 3 provides specific guidance for Lustre settings on DSRC systems.
Section 4 shows how to modify settings with Lustre commands.
Section 5 covers general best practices with Lustre and file management.
2. Lustre Background and Basics
Lustre is a robust file system that consists of servers and storage. A Metadata Server (MDS) tracks metadata (for example, ownership and permissions of a file or directory). Object Storage Servers (OSSs) provide file I/O services for Object Storage Targets (OSTs), which host the actual data storage. An OST is typically a single disk array. A notional diagram of a Lustre file system is shown in Figure 1, with one MDS, three OSSs, and two OSTs per OSS for a total of six OSTs. A Lustre parallel file system achieves its performance by automatically partitioning data into chunks, known as “stripes,” and writing the stripes in round-robin fashion across multiple OSTs. This process, called "striping," can significantly improve file I/O speed by eliminating single-disk bottlenecks.
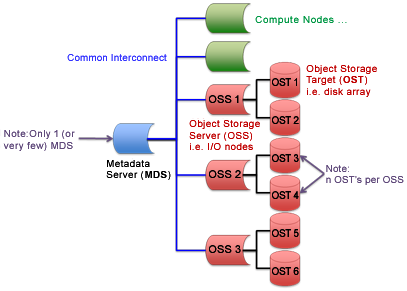
Figure 1. A diagram of an example Lustre file system and its components.
The term "stripe count" refers to the number of stripes into which a file is divided; in other words, the number of OSTs that are used to store the file. Thus, each stripe of the file will reside on a different OST. "Stripe size" refers to the size of the stripe written as a single block to an OST.
Advantages of striping include: 1) increased I/O bandwidth due to multiple areas of the files being read or written in parallel, and 2) helping to maintain balance in the usage across the pool of OSTs. However, striping has disadvantages if done incorrectly, such as increased overhead due to internal network operations and server contention, and degraded bandwidth through inappropriate stripe settings.
Users have the option of configuring the size and number of stripes used for any file they own. Determining the best settings sometimes requires experimentation, but there are general rules-of-thumb.
Suppose for example, 200 MB are to be written to a file that was created with a stripe count of 10 and a stripe size of 1 MB. When the file is initially written, 10 1-MB blocks will be simultaneously written to 10 different OSTs. Once those 10 blocks have been filled, Lustre writes another 10 1-MB blocks to those 10 OSTs. This process is repeated for a total of 20 times until the entire file has been written. Upon completion, the file will exist as 20 1-MB blocks of data on each of 10 separate OSTs.
The following table lists technical specifications for the Lustre work file systems on our HPC systems:
| System | File System | Maximum Capacity | Number of OSTs | OST Capacity | Default Stripe Count | Default Stripe Size |
|---|---|---|---|---|---|---|
| Onyx | /p/work | 12.8 PB | 78 | 168 TB | 1 | 1 MB |
The environment variable $WORKDIR refers to each user's principle work directory, which may be only one of the work file systems on any given system.
3. Lustre Stripe Guidance
The default stripe counts and stripe sizes have been chosen to balance the needs of I/O performance across several scales of parallel execution and file sizes. Small files should be striped with a count of 1. However, setting the stripe count too low can degrade I/O performance for larger files and parallel I/O. Therefore, you should carefully match stripe specifications to your data.
Striping should be compatible with the application's I/O strategy and the size of the output. Increasing the stripe count and/or stripe size should be done proportionally with the number of nodes used for I/O. As a rule, an application should try to use as many OSTs as possible. So, if writing a large single file in parallel, set the stripe count to the maximum allowed value. Alternatively, when writing many small files in parallel, set the stripe count to 1. An intermediate number of simultaneous output files may perform best with a stripe count greater than 1. Experimentation with the stripe count is often helpful for best performance. Yet, often the file size is correlated to the number of compute nodes writing to it in parallel, so stripe settings based on file size are a sufficient yet simpler starting point. One can tune for further performance from there. The following table offers some striping guidelines based on file size.
| File Size, Per File | Onyx | |
|---|---|---|
| Stripe Count † | Stripe Size ‡ | |
| <= 10 MB | 1 | 1 MB |
| 10 MB to 100 MB | 1 | |
| 100 MB to 1 GB | 2 | |
| 1 GB to 10 GB | 4 | |
| 10 GB to 100 GB | 8 | |
| 100 GB to 512 GB | 16 | |
| 512 GB to 1 TB | 16 | |
| 1 TB to 2 TB | 32 | |
| 2 TB to 4 TB | 32 | |
| 4 TB to 10 TB * | 32 | |
| >= 10 TB * | 64 | |
| Maximum § | 78 | n/a |
| * When writing very large files, note that the tape archive system cannot archive files larger than 7 TB. | ||
| † The default stripe count for $WORKDIR on Onyx is 1. Efficient storage of files <= 100 MB requires the user to leave the stripe count at 1. | ||
| ‡ Onyx storage is configured with a stripe size of 1 MB. Experimentation may in some cases show improved performance by using stripe sizes of 2 MB, 4 MB, or possibly higher. Note that higher stripe sizes can consume more memory. | ||
| § Maximum recommended stripe count and stripe size for the system. While the system may allow larger settings, exceeding these could cause performance or stability issues. There may be no known maximum stripe size, but large sizes can result in more memory usage. | ||
4. Lustre Striping Commands
As implied by the above tables, the file system stripe count and size have default settings. Stripe parameters can be set for individual files and set or changed for directories. Directories can be given a stripe setting so that all new files created in that directory (and under any sub-directory) share that setting. Lustre provides utilities and application libraries to allow users to control the striping of individual files at creation time. However, changing the stripe parameters on an existing file has no effect. You must first create an empty file with the desired striping characteristics and then write your data to it. Likewise, changing the stripe parameters on a directory does not change the striping of files already existing in that directory. Only new files created in the modified directory will inherit the changed striping.
4.1. The lfs getstripe Command
The "lfs getstripe" command reports the stripe characteristics of a file or directory.
Syntax:
$ lfs getstripe [--stripe-size] [--stripe-count] [--stripe-index] <directory|filename>
Examples:
$ lfs getstripe MyDir
MyDir
stripe_count: 1 stripe_size: 1048576 stripe_offset: -1
The output shows that files created in the directory MyDir will be stored using one stripe of 1048576 bytes (1 MB) per block unless explicitly striped otherwise before writing. The stripe_offset (also known as stripe index) of -1 means that each file will have an OST placement determined automatically by Lustre (see "lfs setstripe", next).
$ lfs getstripe --stripe-count --stripe-index MyFile
lmm_stripe_count: 4
lmm_stripe_offset: 65
This shows that file MyFile is striped across four OSTs (i.e. has a stripe count of 4), and that the first OST in the group is number 65.
4.2. The lfs setstripe Command
To set the striping for a file or directory, use the "lfs setstripe" command.
Syntax:
$ lfs setstripe --stripe-size stripe_size --stripe-count stripe_count
file-or-directory
stripe_size - # of bytes written to one OST before cycling to the next
stripe_count - # of OSTs
The "lfs setstripe" command has an option for changing the stripe size, but the default stripe size is recommended for most applications. Moreover, the "lfs setstripe" command also has an option (intentionally not shown above) for setting the position of the first stripe among the OSTs, called the index. Users should not specify an index. Instead, allow the Lustre file system to choose an index in order to help maintain overall file system performance.
Not specifying a parameter will set it to the default. Therefore, if you wish to specify both stripe count and stripe size, then do so in a single command.
The following creates an empty file named LargeFile with a stripe count of 8.
$ cd $WORKDIR
$ lfs setstripe --stripe-count 8 LargeFile
Next, set the stripe count to 16 for a new directory named LargeDir. Note that any subdirectories or files created under LargeDir will inherit its new stripe characteristics.
$ cd $WORKDIR
$ mkdir LargeDir
$ lfs setstripe --stripe-count 16 LargeDir
Finally, set the stripe count to 32 and the stripe size to 2 MB for a new file named HugeFile.
$ cd $WORKDIR
$ lfs setstripe --stripe-count 32 –-stripe-size 2097152 HugeFile
5. Best Practices
The "lfs setstripe" command can be placed in a PBS batch script or executed interactively before job submission. A good practice is to create new, special output directories with appropriate striping within the PBS batch script for large output files. This is because files created during program execution will inherit the characteristics of the directory into which they are written.
A file can be generated in several ways, such as by writing data to it from an executing program, by copying an existing file, by extracting a tar file, or by using the Linux command ‘cat’. As far as striping is concerned, the key criteria is not how the file is generated, but whether or not a file of that name already exists (it does not matter if the file is empty or not). If you generate a file of the same name as a file that already exists, it will retain the striping characteristics of the existing file because you are really just changing the contents of the file. If the file does not already exist, then it really is “new”, and so it will inherit the striping characteristics of the directory where it is created. As such, keep in mind the following best practices:
- Overwriting a file without first deleting it will cause it to inherit the original file’s striping.
- If a file is “moved” across the same Lustre file system, then it is not a new file, and its striping characteristics are not changed.
- A file copied from one directory to another, such as with cp,
cat, scp, or tar, inherits the striping of the new
directory or the existing file if the filename already exists. Here are some related tips:
- Use this to your advantage by striping a directory for certain types of files.
- Consider the stripe characteristics of a target directory before copying, e.g., a large file into a directory set up for small files.
- Similarly, moving a file off the Lustre file system or using archive commands like tar will not preserve the striping of the file. When restoring the files from another file system or a tar archive, the files inherit the striping of the parent directory or the existing file if the filename already exists.
- Changing the striping parameters for a directory does not change the striping for files already in that directory. Only new files written into that directory will inherit the revised striping.
- Attempting to change the striping parameters of a file will also fail. Only new files get new striping.
View the lfs man page on any HPC system for additional information.
In addition to striping considerations, for good Lustre performance, small I/O requests or writing many files should be avoided. It is better to gather small requests into a buffer, and write the buffer when it is full. On Cray machines, the iobuf facility is recommended for this kind of I/O aggregation. (For more information, load the iobuf module and see "man iobuf".) On all machines, the Intel Fortran compiler can also enable buffering with the "-assume buffered_io" flag. Application-level I/O libraries that may offer improved performance include MPI/IO, ADIOS, NetCDF, and HDF5. Some of these libraries may set striping for you while others may require manual setting for output files.